Best Optimization Guide for Warzone: Pacific - Highest FPS & No Lag
Warzone: Pacific is one of the most immersive and exciting first-person shooter games on the market. With its stunning graphics and intense gameplay, players can quickly get lost in the action. However, nothing is more frustrating than experiencing lag or low FPS when trying to compete. That's why we've created the ultimate optimization guide to help you achieve the highest FPS and no lag while playing Warzone: Pacific. In this article, we'll cover everything from system requirements to in-game settings, and even hardware upgrades, to ensure you have the best possible gaming experience. So, let's dive in and get started!
Optimize the Warzone Pacific In-Game Settings
VRAM Usage Indicator
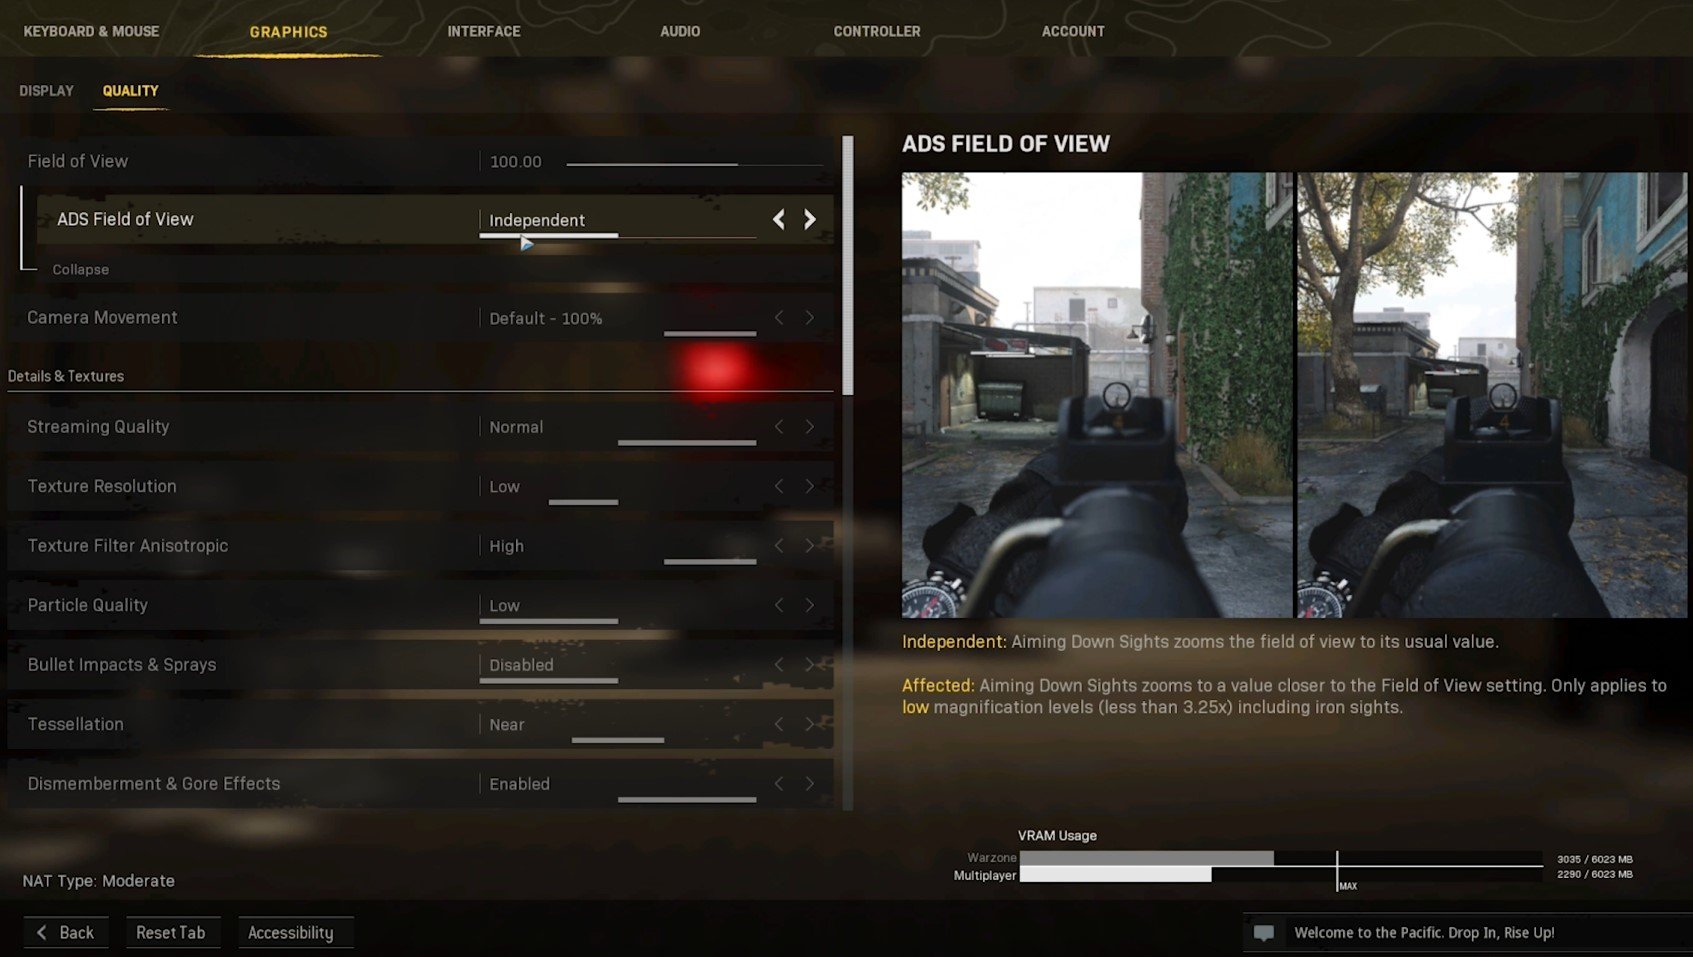
In the Graphics tab, you can preview your expected VRAM usage for Warzone and Multiplayer on the bottom right. This is a good indicator when applying your Display & Quality settings, and you should try to lower your VRAM usage below this MAX line.
Set your Window Mode to Fullscreen. This will in any way prevent micro stutters and will help keep a better framerate. Set your Display Adapter to your main GPU. Set the Screen Refresh Rate to the refresh rate of your monitor. You can only change this setting when in Fullscreen mode, and it will use your current display refresh rate when using windowed or borderless mode.
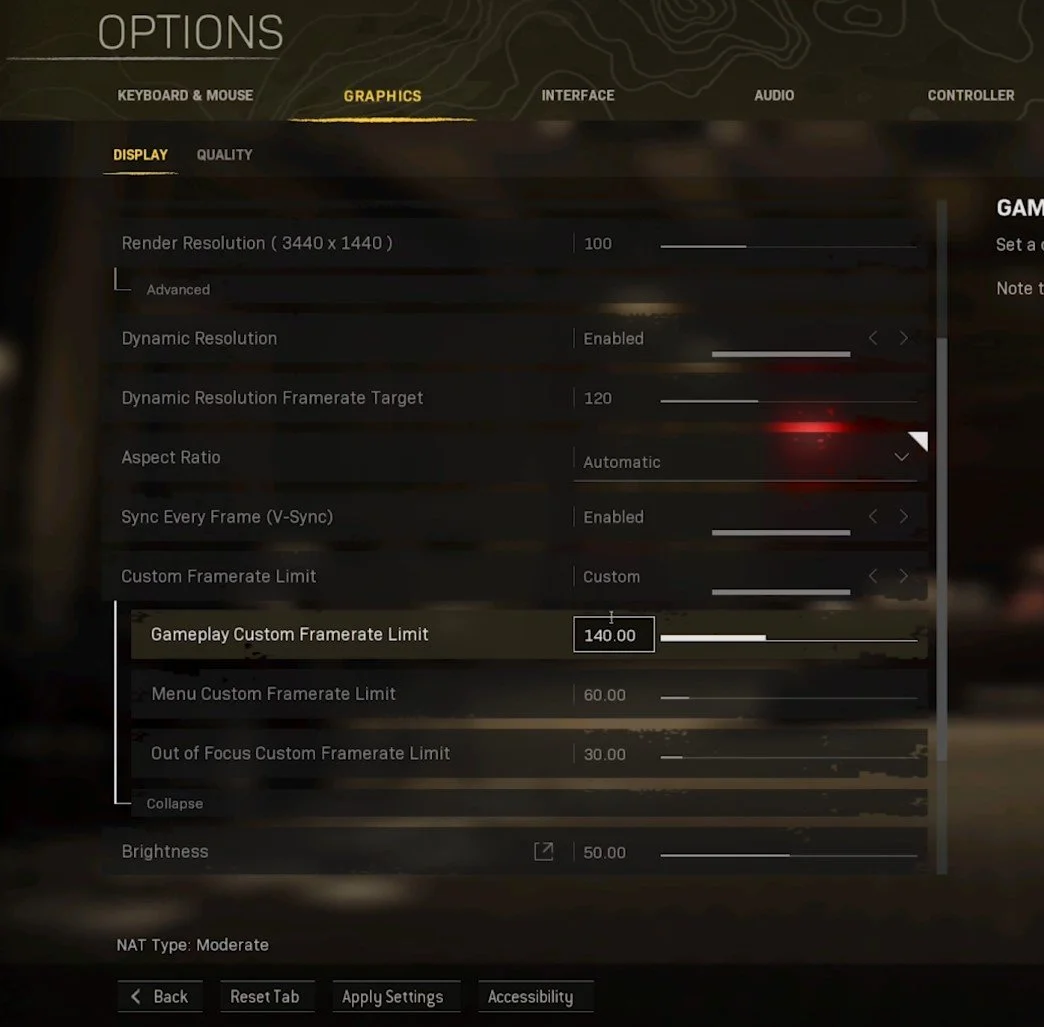
Below, you will want to use a Render Resolution of 100. For low-end PCs or laptops, you might want to lower this to around 90%, which will greatly increase your FPS, but the visual quality will suffer a lot the lower you set this. As you can see, your VRAM usage will change a lot when decreasing or increasing this setting.
Enable the Dynamic Resolution option to allow the game to adjust your render resolution to keep a more stable target frame rate. Set the Aspect Ratio to Automatic using your native monitor aspect ratio. It would be best if you disabled V-Sync, as it can look like your frame rate will have been greatly reduced. If you can utilize a high-end graphics card and reach a high frame rate, you might want to enable this option to get a better viewing experience.
Warzone Settings > Graphics
Set the Custom Frame rate Limit to Custom and expand your FPS options. We will set our Gameplay Custom Framerate Limit to 140, as everything above would be a performance waste for our PC. You will want to set this option above your Dynamic Resolution Frame Rate Target, but below the maximum FPS, you can get. The Menu Custom Framerate Limit should be set to around 60, and the Out of Focus FPS option will be set to 30 by default, which is more than enough.
Custom Framerate Limit for Warzone: Pacific
The brightness option will not impact your performance, so set this option according to your preference. When using an NVIDIA graphics card, and these last options are available, enable your NVIDIA Highlights and NVIDIA Reflex Low Latency settings.
NVIDIA Reflex Low Latency
Warzone Quality Settings
We will look at your Quality settings. We like to use a FOV of 100 and the ADS FOV of Independent, which will use the usual FOV increase when aiming down sights. When setting this option to Affected, your FOV will decrease according to your FOV setting above.
ADS FIeld of View
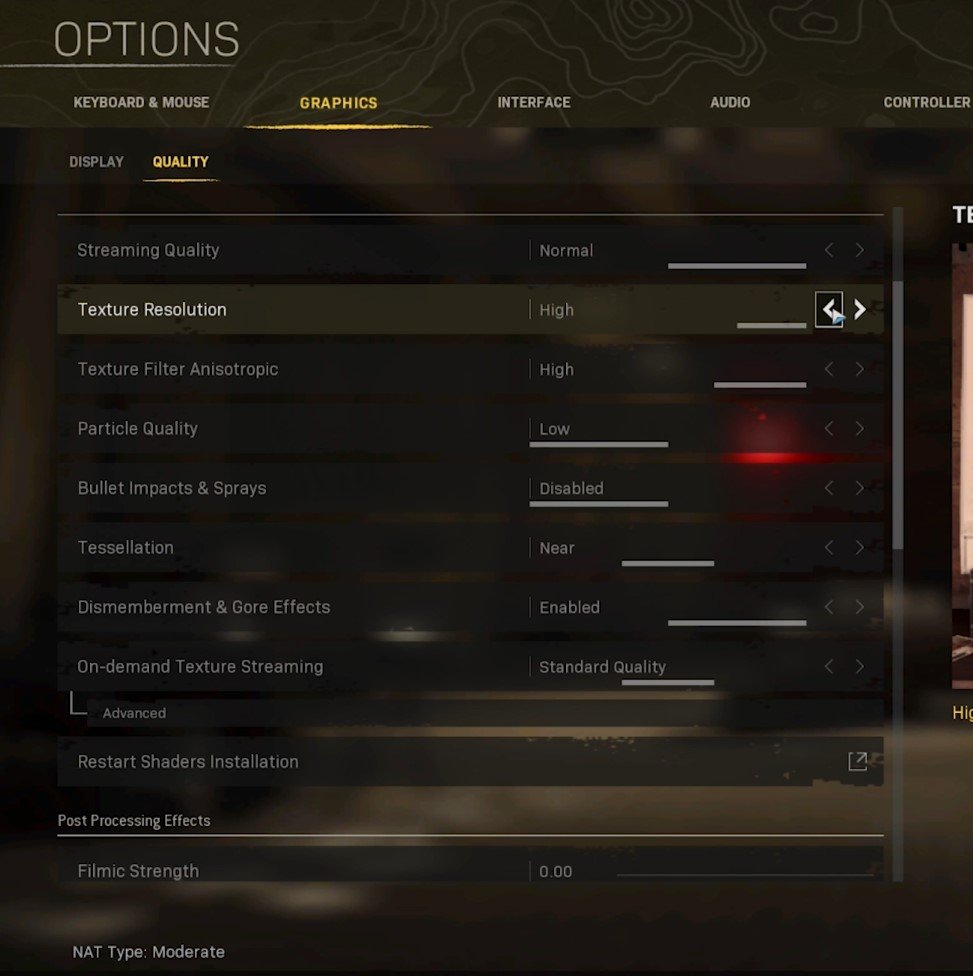
Under Details & Textures, you want to set your Streaming Quality and Texture Resolution options according to your expected VRAM usage. Especially your Texture Resolution will have a lot of impact on your gaming performance. Low-end PCs should run better when setting the Streaming Quality to Normal and Texture Resolution to Low or Very Low.
Graphics Settings > Texture Resolution
Set the Texture Filter Anisotropic option to Normal and Particle Quality to High, as it will have less impact on your performance.
Bullet Impacts & Sprays can be enabled if you don’t find them distracting, and set the Tessellation option to Near, which will only apply tessellation to near objects on the map. Your On-demand Texture Streaming setting will enable you to change how much of your network connection will be used to update your game with new textures. This will largely depend on your network connection. The default values should be fine for most users.
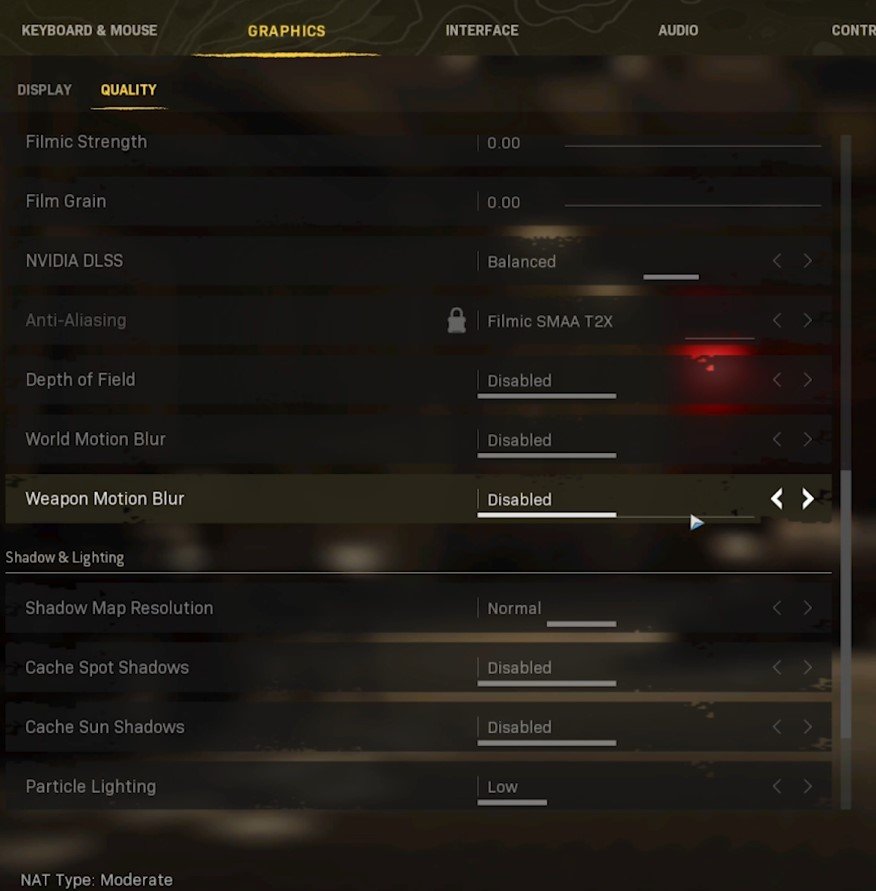
In your Post Processing Effects section, set most options according to your preference. You should use the NVIDIA DLSS option when using an NVIDIA RTX card. When setting this option to Balanced, your GPU will help increase the performance and image quality of the game. If you want to disable Anti-Aliasing, you must also disable the NVIDIA DLSS option, so play a game and see what looks best to you. I prefer to disable the World Motion and Weapon Motion Blur settings. Set Particle Lighting to Normal, disable DirectX Raytracing, set the Ambient Occlusion option to Dynamic Objects, and disable Screen Space Reflections to get the most performance.
Warzone Custom Quality Settings
Preview the CPU & GPU Utilization
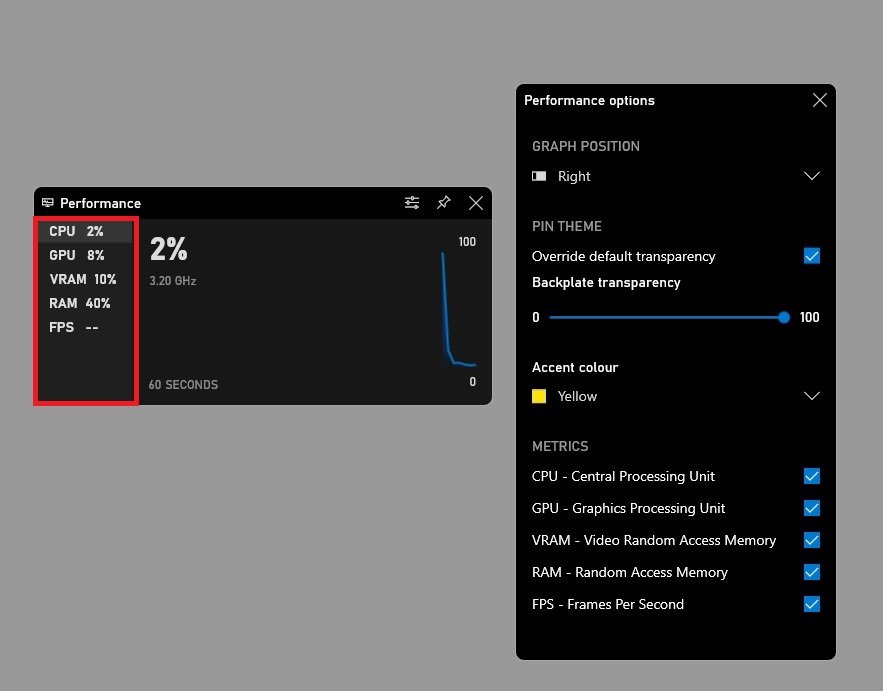
If you want to preview your CPU and GPU utilization while in-game, I suggest using your built-in Xbox Game Bar overlay. When using the shortcut Windows key + G, you can pin the performance window anywhere on your screen, and when using the shortcut again, it will stay on your main screen. You can preview your CPU and GPU utilization in percent and your VRAM and RAM usage.
Xbox Game Bar Overlay > Performance Widget
Change the Call of Duty Modern Warfare Process Priority
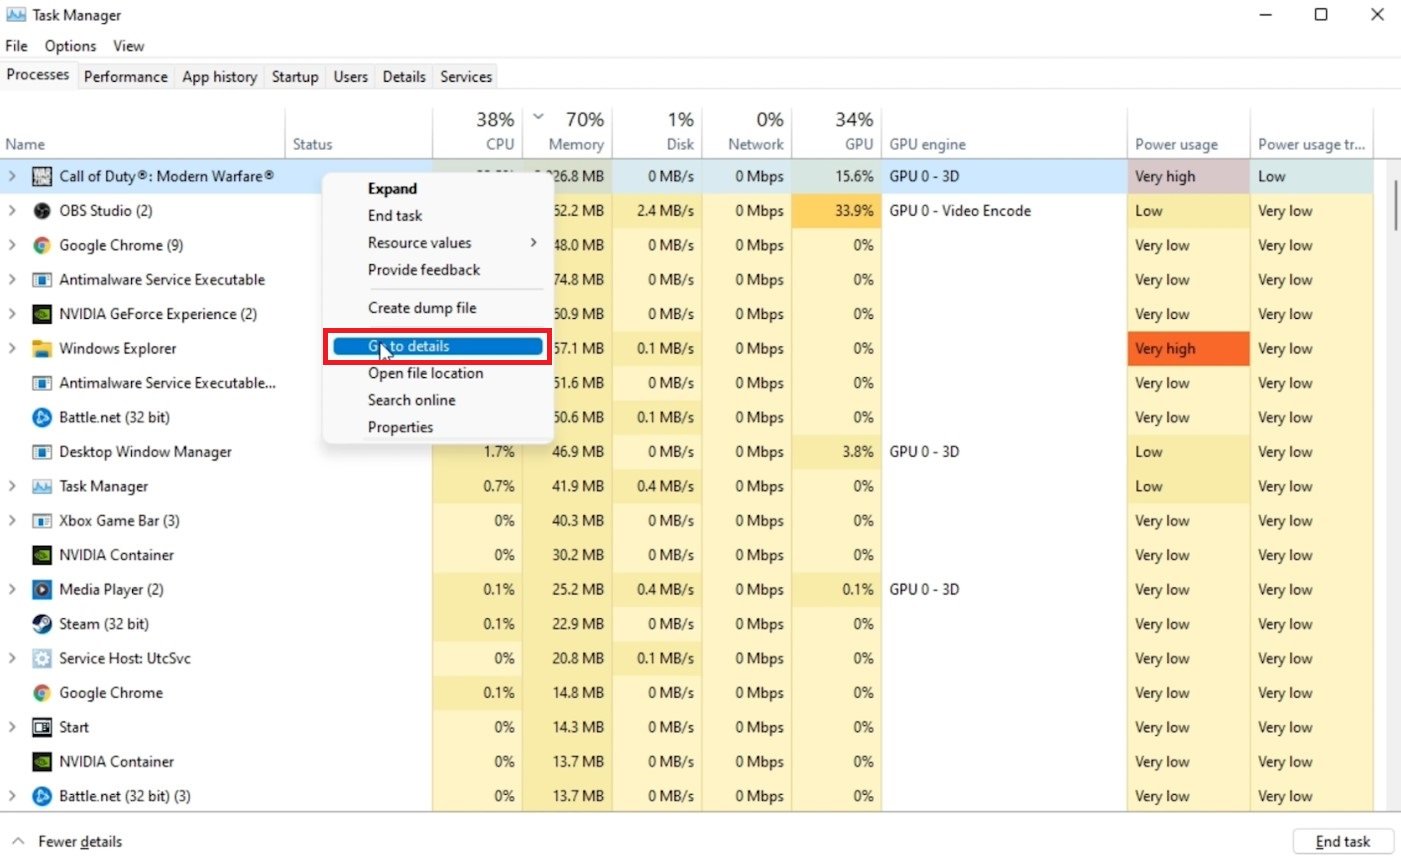
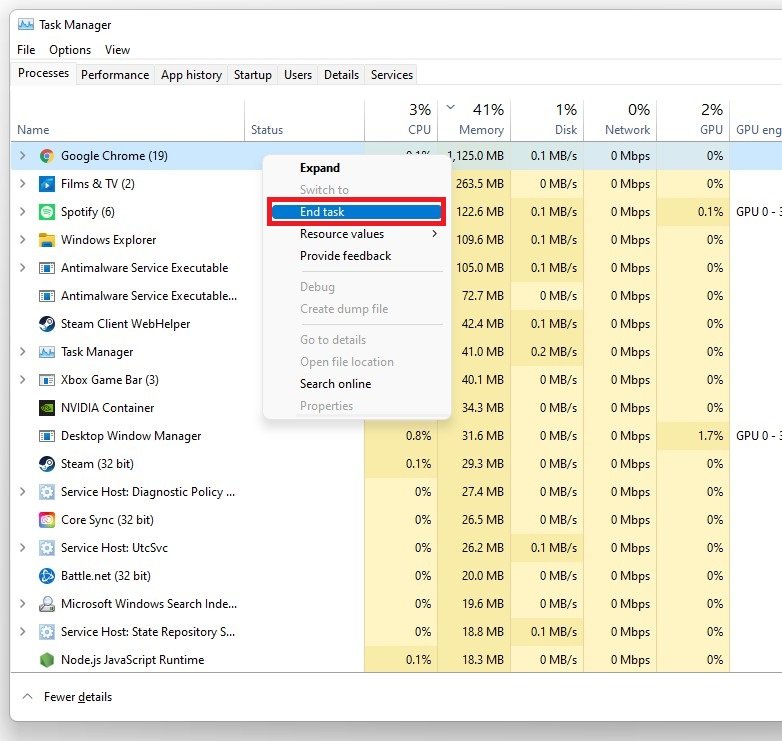
After applying your changes, leave the game running and open your Task Manager by searching for it in your Start Menu search. In the Processes tab, right-click the Modern Warfare process and select to go to Details.
Task Manager > Processes > Modern Warfare > Go to Details
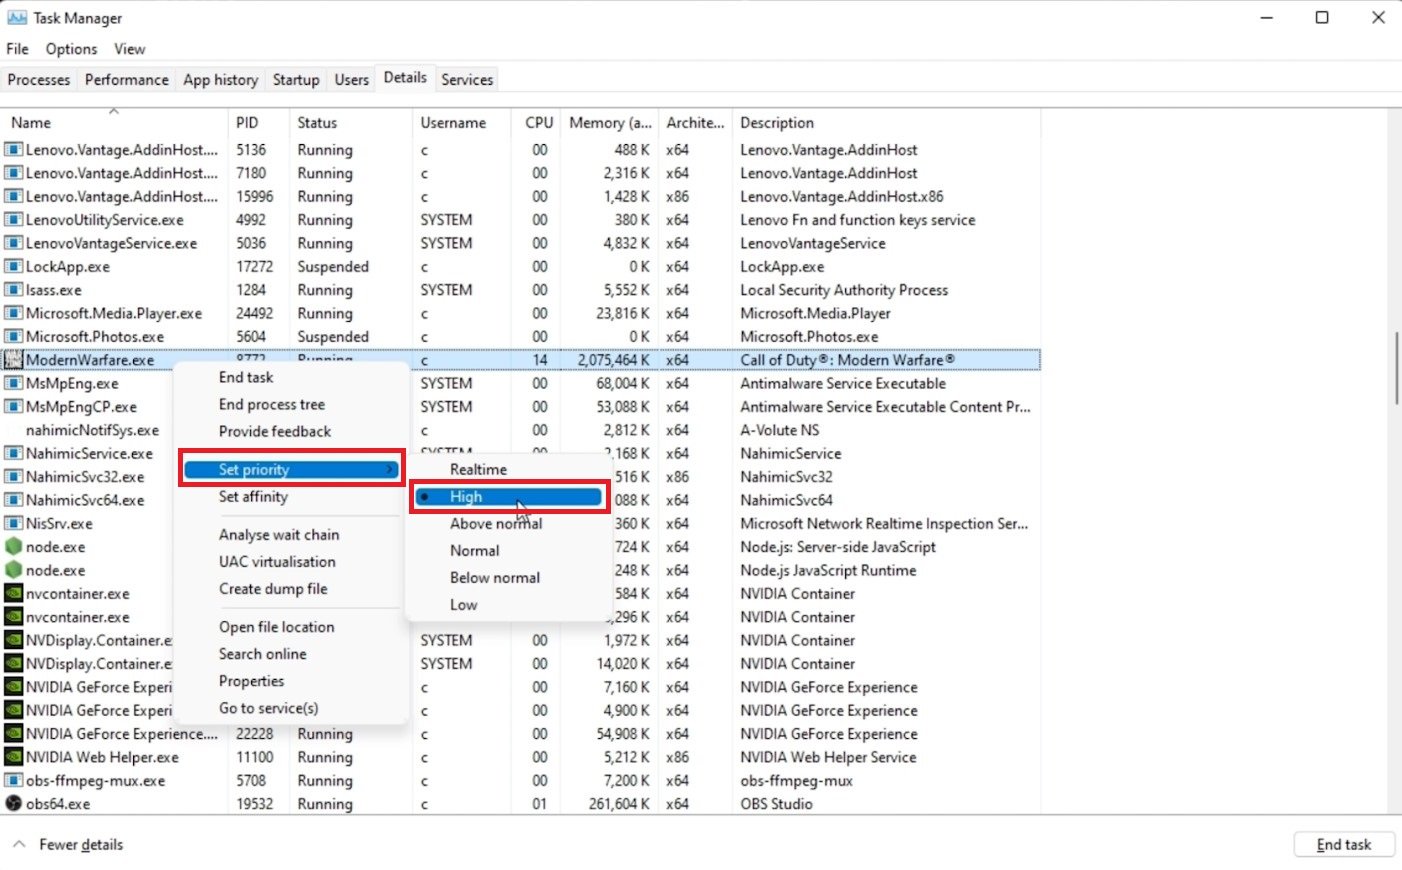
In the Details tab, right-click the highlighted process and set it’s priority to High.
Set Priority > High
To reduce the CPU utilization from other programs, we suggest you end some programs from running in the background, which you don't need when playing the game. But make sure only to end programs from running, which you know won't break your operating system.
End resource intensive applications from running on your PC
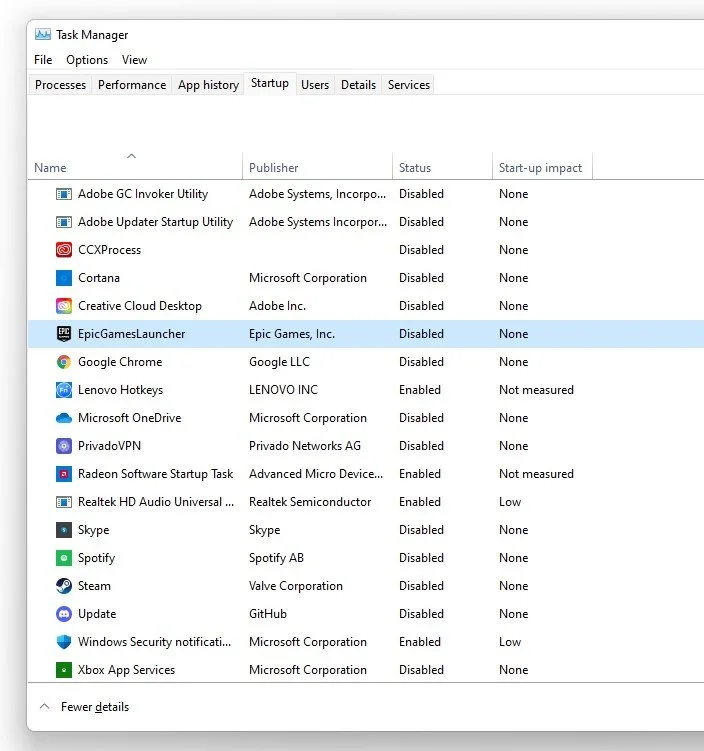
In the Startup tab, you can prevent programs from starting on system boot. You can then close your Task Manager and Modern Warfare.
Task Manager > Startup
Change the Modern Warfare Warzone Graphics Preference
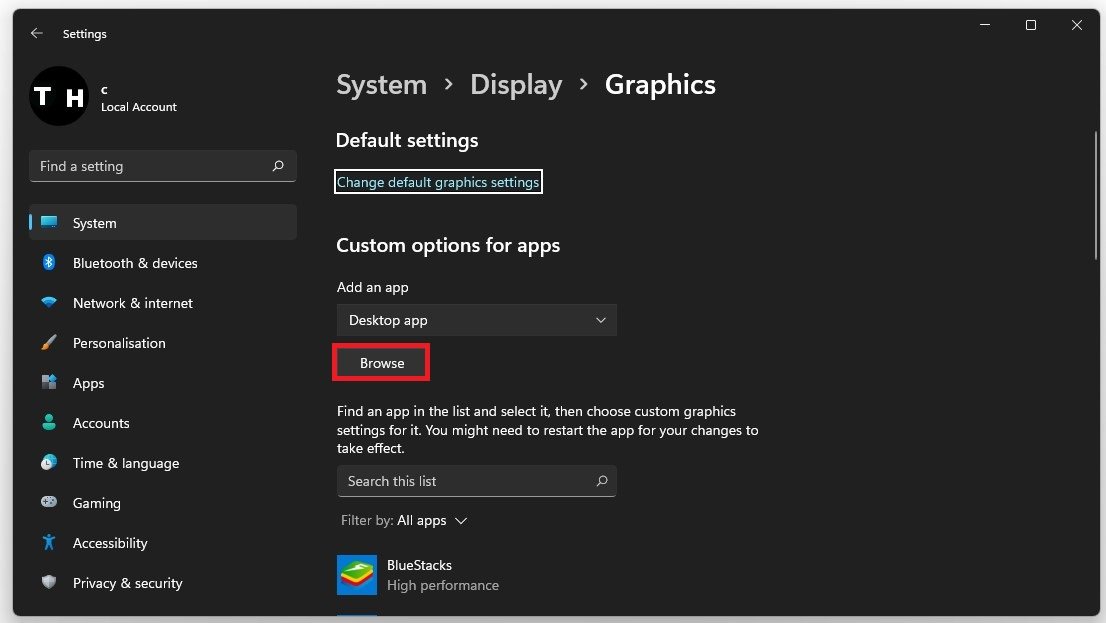
Search for Graphics in your start menu search to open up your Graphics system settings window. Under Custom options for Apps, select Browse, and your file explorer will open up.
System Settings > Display > Graphics
Navigate to the drive on which you saved Modern Warfare on > Program Files > Call of Duty Modern Warfare and here select the ModernWarfare application and click on Add. This will add Modern Warfare to this list below.
Program Files > Call of Duty Modern Warfare
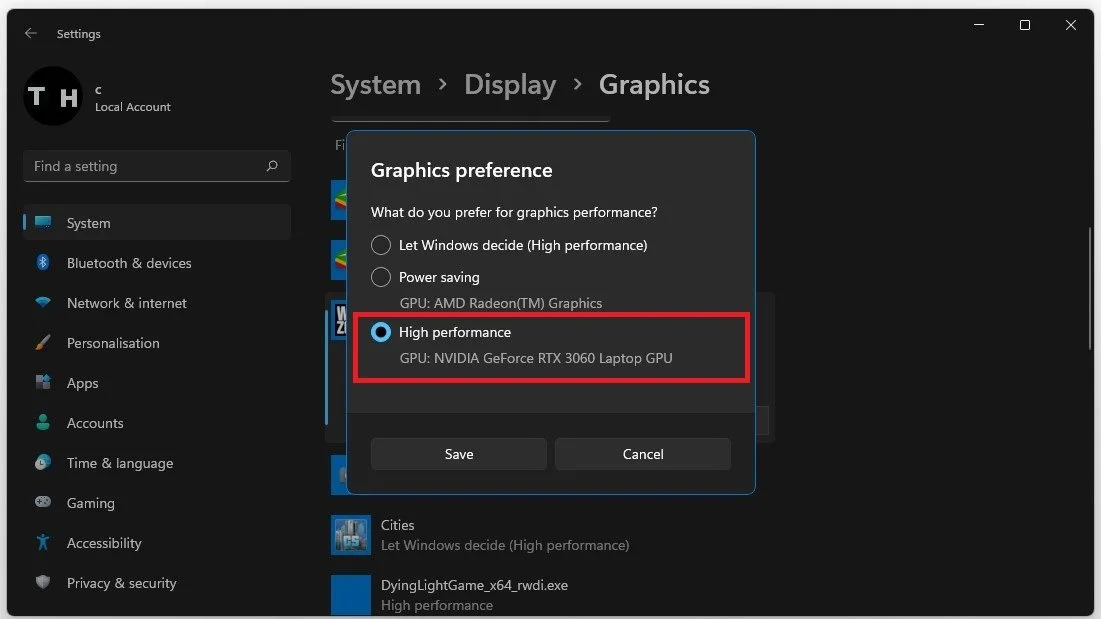
When selecting Options for Modern Warfare, make sure to set the Graphics preference to High performance, which in most cases, will take advantage of your graphics processor to help run the game on your system.
Graphics Settings > Graphics Preference > High Performance
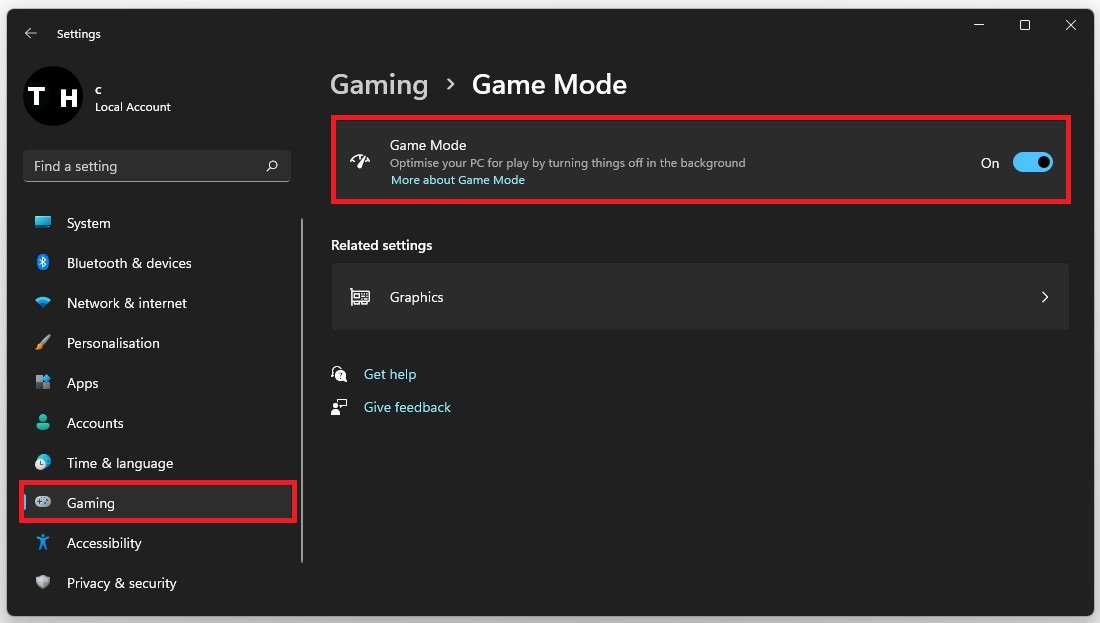
Enable / Disable Windows Game Mode
When this is done, navigate to the Gaming section. Under Game Mode, you can enable or disable Game Mode on your PC.vIn theory, Game Mode should prevent Windows Update from performing driver installations and sending restart notifications and help achieve a more stable frame rate while in-game. Some users have reported that disabling this option will drastically increase their gaming performance on Windows 11 or 10. We suggest enabling this option to increase your overall gaming performance.
Windows Settings > Gaming > Game Mode
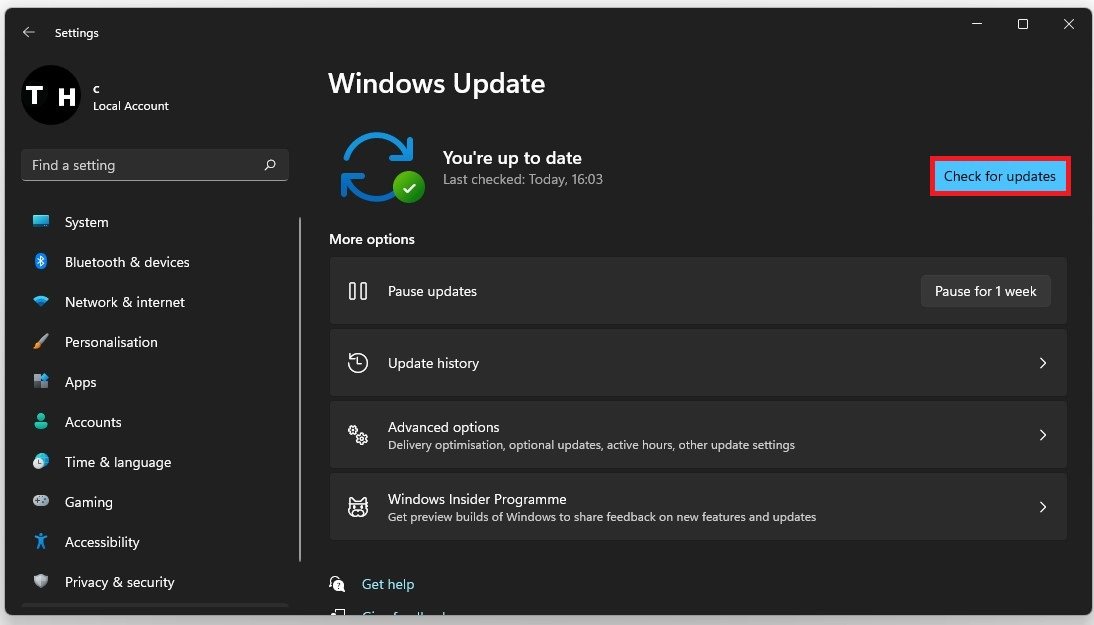
Windows OS Update
Open your Settings window and search for Update to access your Windows Update settings. Make sure to Check for Updates, and if there is an update available to you, download it before restarting your PC, which will install the update for you.
Windows Settings > Windows Update
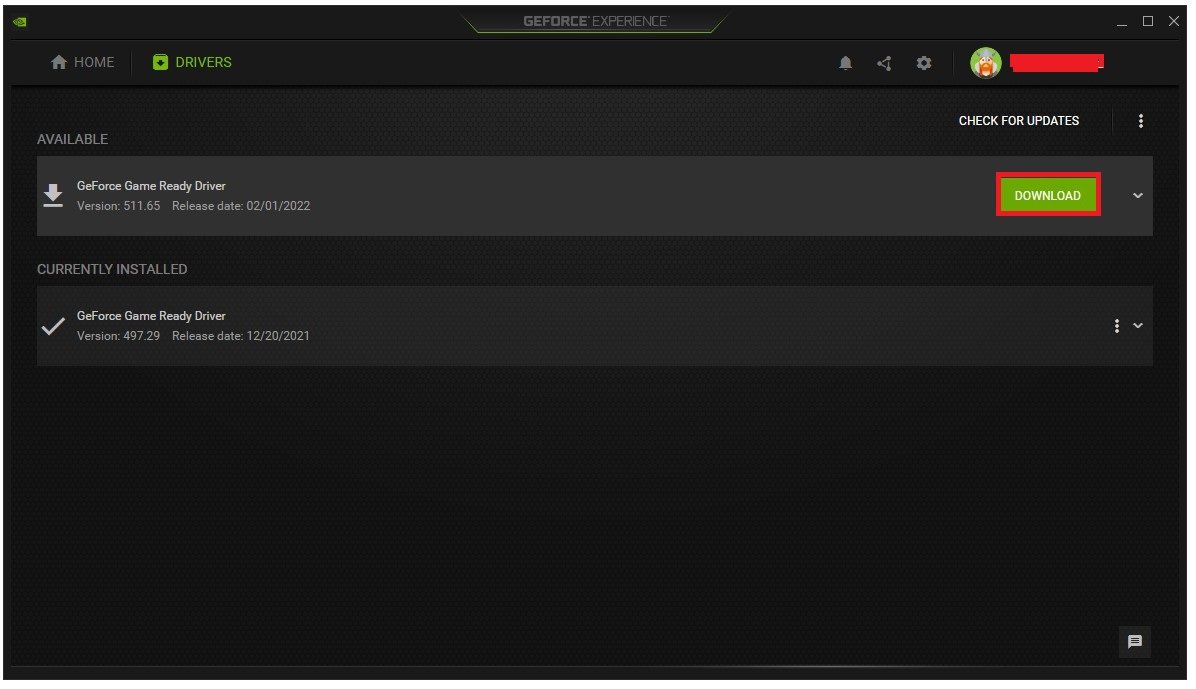
Update Graphics Card Driver
You should also ensure that your graphics card driver is up to date. We suggest using the GeForce Experience application when an NVIDIA GPU, but you can also use the AMD Radeon Software. In the Drivers tab, click on Download and the application will automatically download and install the latest driver. Repeat this step a few times a year to ensure you get the most out of your hardware.
GeForce Experience > Drivers > Download
Modern Warfare Warzone Custom Settings
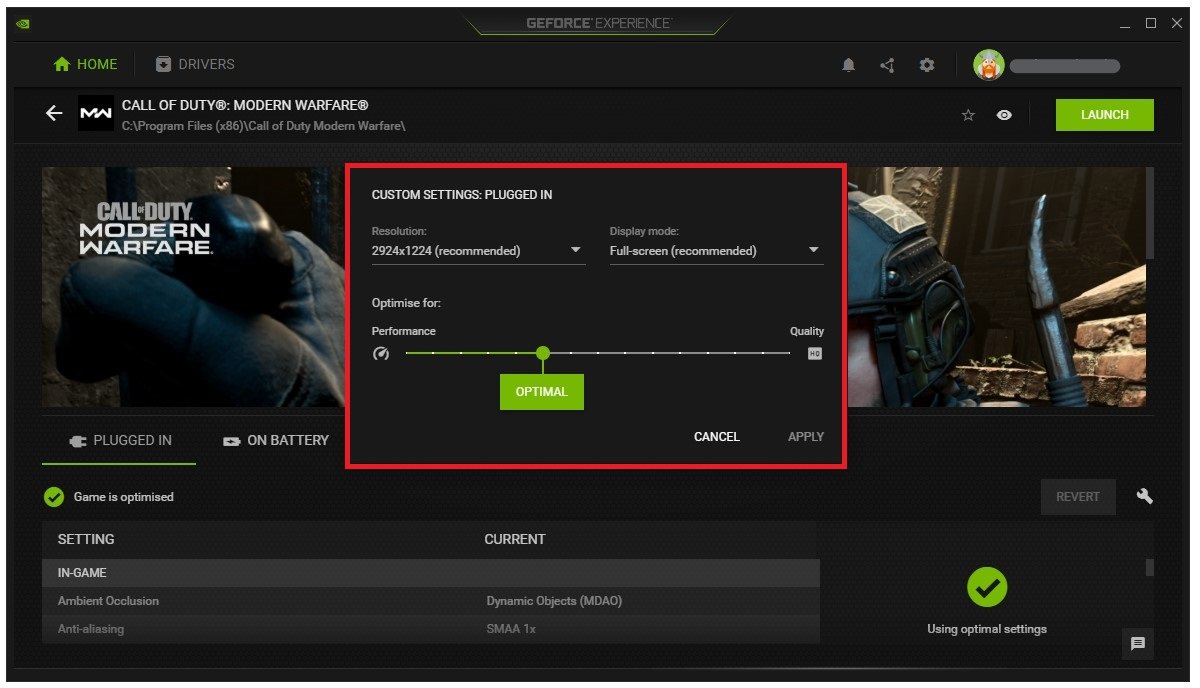
In the Home tab, you can access individual game settings, which can also be changed from here. Simply select Details for Modern Warfare. Depending on your hardware, you will be presented with current in-game settings and the optimal settings suggestion.
When selecting Optimise, GeForce Experience will apply the recommended settings to the game. You also have the option to use custom settings when selecting the wrench icon. Use this slider system to reduce some options and change your display resolution and display mode in case you are using an abnormal screen resolution as I am.
GeForce Experience > Home > Call of Duty Modern Warfare > Custom Settings
Use NVIDIA Image Scaling
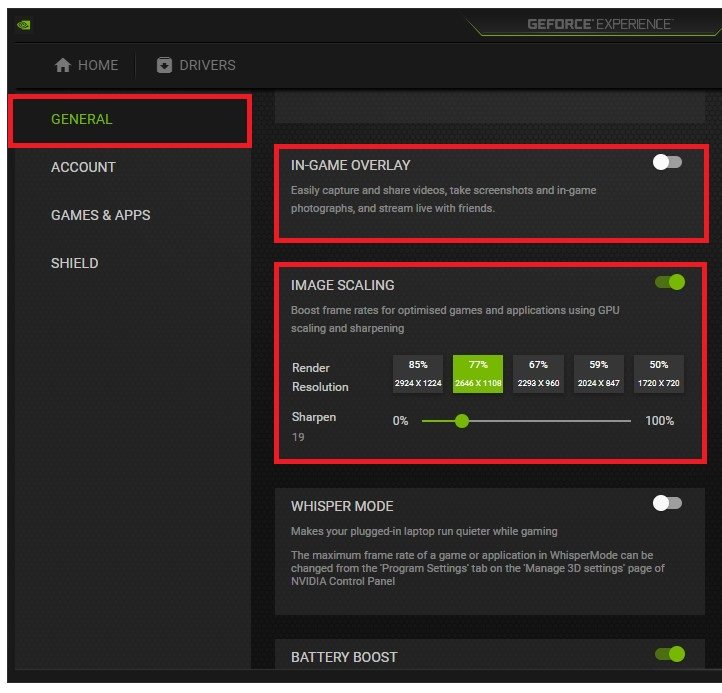
When navigating to your GeForce Settings, disable the In-Game Overlay in your General settings tab, as application overlays often cause performance issues. Below, you have the option to enable the Image Scaling option. For some of you, the option is unavailable as your graphics driver is not current. Enabling NVIDIA Image Scaling can dramatically increase your frame rate for any game you play on your PC.
GeForce Experience > General Settings > Image Scaling


