

Fixing the VAN9003 Vanguard Error in Valorant: A Step-by-Step Guide
Introduction
Valorant has taken the gaming world by storm, offering a unique blend of fast-paced first-person shooter gameplay and tactical strategies. However, like any other game, it's not immune to occasional hiccups and errors. One such issue that has left players scratching their heads is the VAN9003 error, which displays the message "This Build of Vanguard is Out of Compliance." This error can leave you unable to enjoy your favorite game, but don't worry - we've got you covered! In this comprehensive guide, we'll provide a step-by-step solution to tackle the VAN9003 Valorant error and get you back into the action in no time. With the right information, fixes, and insights, you'll soon forget this issue ever existed. So, let's dive right in and resolve the Vanguard compliance issue once and for all!
Terminate All Riot Games and Valorant Processes
Initially, ensure that you close all active Riot Games and Valorant processes on your computer. Launch your Task Manager and navigate to the Processes tab. Locate any Riot Games, Vanguard, or Valorant processes, right-click on them, and select "End Task." This will help eliminate any lingering processes that might be causing the VAN9003 error in your Valorant game.
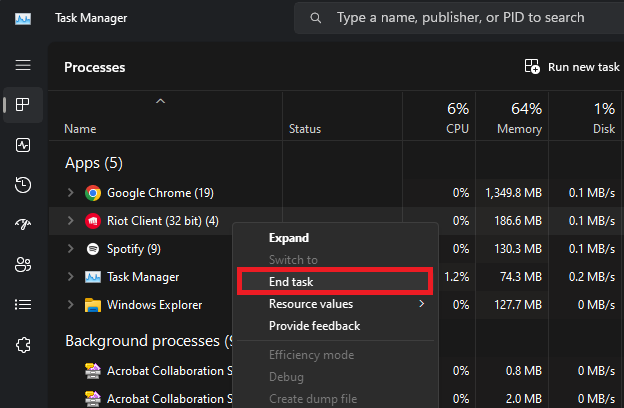
Task Manager > Riot Client (32 bit) > End Task
Modify Valorant Compatibility Settings
After completing the previous step, it's time to tweak your Valorant compatibility settings. Locate Valorant by using your Start menu search and click on "Open File Location."
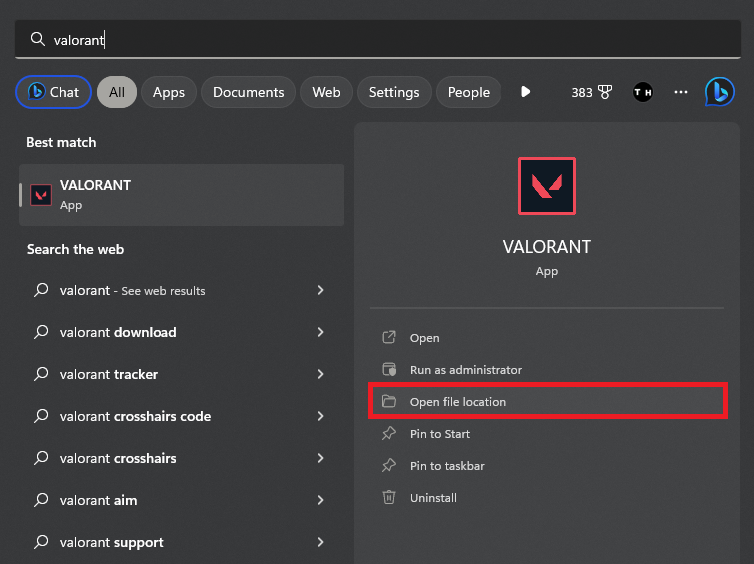
Windows Start Menu > Valorant > Open File Location
The file explorer will appear, presenting the Valorant shortcut. Right-click it to access its properties. Head to the Compatibility tab and choose to run the program in compatibility mode for Windows 7. Be sure to apply the changes you've made.
Performing this adjustment may already resolve the Vanguard out of compliance error you encounter while attempting to launch Valorant.
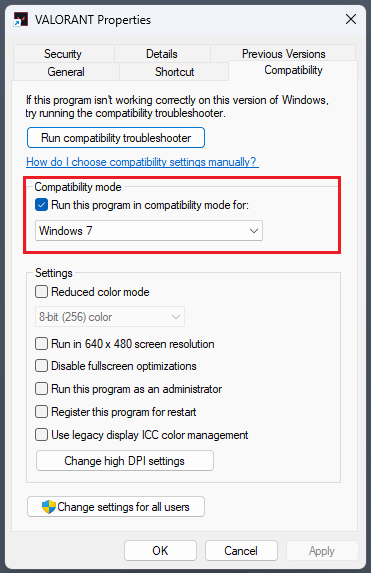
Valorant Properties > Compatibility > Compatiblity Mode: Windows 7
Upgrade and Reboot Windows OS
Should the issue continue, it is crucial to ensure that your Windows operating system is current, as this will also install the most recent drivers required for running Valorant smoothly.
Access your Windows settings, and head to the Windows Update area. Click on "Check for Updates" and proceed to download any available updates. After successfully downloading the update, reboot your PC to apply the changes.

Windows Settings > Windows Update
Enable Secure Boot on your Windows PC
Finally, verify that secure boot is activated on your computer. Launch the System Information application on your PC. Within the System Summary, you can review your BIOS Mode and the Secure Boot State. If it is set to OFF, you'll need to enable it in your BIOS settings during your PC's restart.
To enable Secure Boot State in your BIOS, follow these steps:
Restart your PC and, as it boots up, press the appropriate key (usually F2, F10, F12, or Delete) to enter the BIOS/UEFI settings.
Navigate through the BIOS settings using the arrow keys to find the "Boot" or "Security" tab.
Locate the "Secure Boot" option within the selected tab.
Change the "Secure Boot" setting from "Disabled" or "Off" to "Enabled" or "On."
Save the changes by pressing the designated key (typically F10) or by navigating to the "Exit" tab and selecting "Save and Exit."
Your PC will restart and apply the changes.
Enabling the Secure Boot State ensures that your computer is protected against unauthorized changes, which could help resolve the Vanguard compliance error while trying to launch Valorant.
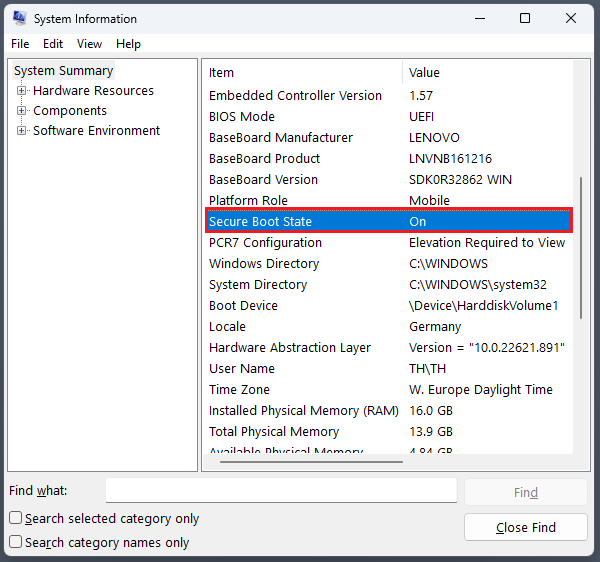
System Information > System Summary > Secure Boot State (ON)
-
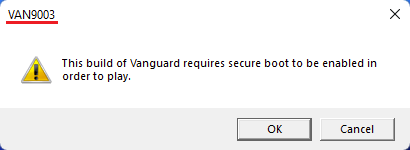
The VAN9003 Valorant error message, "This Build of Vanguard is Out of Compliance," indicates that your Vanguard anti-cheat system is outdated or not functioning properly, preventing you from playing Valorant.
-
To fix the VAN9003 error, close all Riot Games and Valorant processes by opening the Task Manager, locating Riot Games, Vanguard, and Valorant processes in the Processes section, right-clicking each process, and selecting “End Task.”
-
To adjust the compatibility settings, search for Valorant in your start menu search, select "Open File Location," right-click the Valorant shortcut, access its properties, navigate to the Compatibility section, and select to run the program in compatibility mode for Windows 7. Apply your changes, and this might fix the Vanguard out of compliance error.
-
Updating your Windows operating system ensures that you have the latest drivers and system files necessary for running Valorant smoothly. To update your Windows, navigate to the Windows Update section in your settings, click "Check for Updates," download any available updates, and restart your PC.
-
Secure Boot is a security feature that prevents unauthorized changes to your computer, ensuring that only trusted software runs during the boot process. Enabling Secure Boot in your BIOS settings can help resolve the Vanguard compliance error in Valorant by enhancing your system's security. To enable Secure Boot, enter your BIOS settings during the PC's restart, locate the "Secure Boot" option within the "Boot" or "Security" tab, and change the setting to "Enabled" or "On." Save the changes and restart your PC.


