

How To Rename Your Router on Windows PC
Introduction
Wondering how to make your router more recognizable in a sea of default names? You're in the right place. This guide will walk you through the process of renaming your router on a Windows PC, a tweak that's easier than you might think. We'll cover every step from the Control Panel to Local Security Policy settings to ensure a seamless change. Read on to personalize your home network and make it truly your own.
Locate Your Current Router Name
First, identify your existing router name for an effortless transition. Simply click on the Start Menu and type "Control Panel" before hitting Enter. Navigate to "Network and Internet," and from there, go to the "Network and Sharing Centre." This is your dashboard for viewing all active network connections, including your current router name.
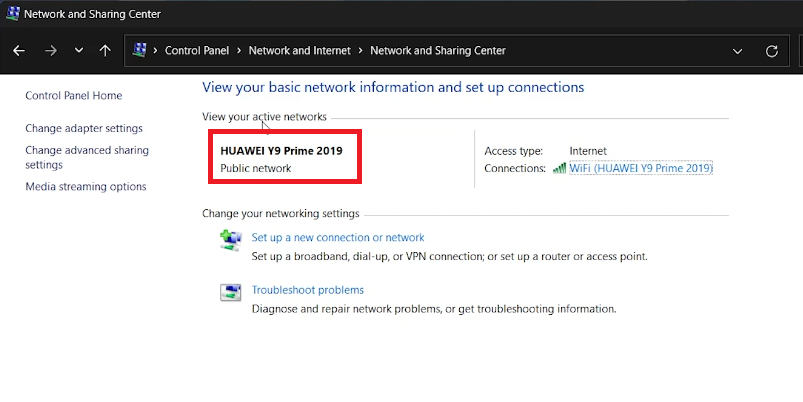
Control Panel > Network and Internet > Network and Sharing Center
Rename Your Router in Windows
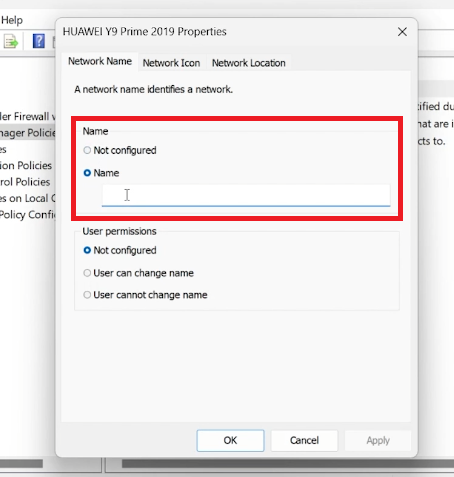
Time to personalize your network identity. Open your Start Menu, search for "secpol.msc," and press Enter. This opens the Local Security Policy window. Here, navigate to "Network List Manager Policies" on the left sidebar.

Local Security Policy > Network List Manager Policies
Look for "Network Name" and double-click to open its settings. Check the box next to "Name" to enable the name editing feature. Enter your preferred router name, hit "Apply," and then "OK."
Your router name will be promptly updated. Keep an eye on the Network and Sharing Center within the Control Panel, as the new name will soon be displayed there.
Router Properties > Network Name
-
You can locate your current router name by accessing the "Network and Sharing Centre" via the Control Panel. This section lists all active network connections along with their names.
-
The "secpol.msc" is the Local Security Policy editor in Windows. It offers advanced settings like renaming your router under "Network List Manager Policies.”
-
Renaming your router won't affect your connected devices immediately. However, you may need to reconnect them to the newly named network.
-
Windows generally allows alphanumeric characters in router names but avoid using special characters to ensure compatibility with all devices.
-
The new router name typically updates instantly but may require a system or router restart for it to be fully propagated across the network.


