How To Block All Incoming Calls or Unknown Callers on your iPhone (New Update)
Introduction
Welcome to a quick guide that will walk you through the process of blocking all incoming calls or unknown callers on your iPhone. In the fast-paced digital age, unwanted calls can be a significant disruption, particularly those from unknown sources. Fortunately, with the latest updates on your iPhone, you can effectively manage your call settings to establish a "Do Not Disturb" focus mode, giving you control over who can reach you. From adjusting your settings to defining who can disturb your peace, to enabling and disabling this feature in a few quick taps, this guide has got you covered.
Fine-Tune Your iPhone's Do Not Disturb Feature
Ready to curate your own call environment? Navigate to your iPhone's settings and choose the 'Focus' option. From there, select the 'Do Not Disturb' feature.
In the 'People' segment, ensure either no one can disturb your peace, or only chosen emergency contacts have this privilege. For instance, consider you only want immediate family members like your spouse or children to be able to reach you during important meetings. Here's where you can customize those settings.
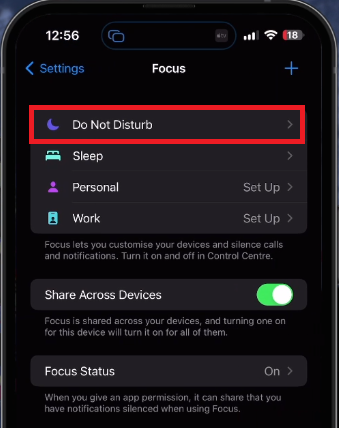
iPhone Settings > Focus
Next, move to the 'Allow Notifications From' section. Set the 'Phone Calls' preference to either 'Allowed People Only' or 'Contacts Only'. This step ensures that only callers saved in your Apple ID contacts can connect with you, securing your call environment from unwanted disturbances. This includes contacts synced across your Apple devices, like your Mac.
An additional feature is the 'Allow Repeated Calls' option. Disabling this prevents someone from getting through if they attempt to call a second time within three minutes, adding an extra layer of disturbance prevention.
By enabling this robust 'Do Not Disturb' feature, any unsolicited or unknown callers are conveniently directed straight to voicemail. This way, you can stay focused and manage your calls effectively.
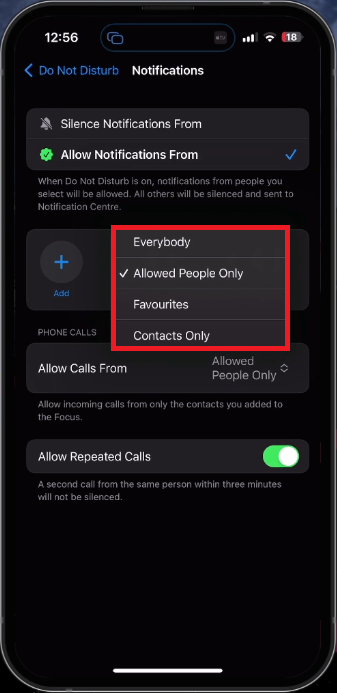
iPhone Settings > Focus > Do Not Disturb > People
Activating the Do Not Disturb Feature for Call Management
To manage incoming calls efficiently, engage the 'Do Not Disturb' feature through your iPhone's control centre. Achieve this by simply swiping up or down on your screen, and then activating 'Focus Mode'.
This flexibility lets you toggle the 'Do Not Disturb' feature ON and OFF based on your convenience, permitting you to maintain undisturbed work or relaxation periods. Moreover, you can customize this feature by setting a specific time limit for your focus modes. For example, you may want to schedule undisturbed time slots during your peak productivity hours, your daily meditation routine, or your child's bedtime story hour. By using this feature, your iPhone serves as a valuable tool in managing and balancing your personal and professional life.
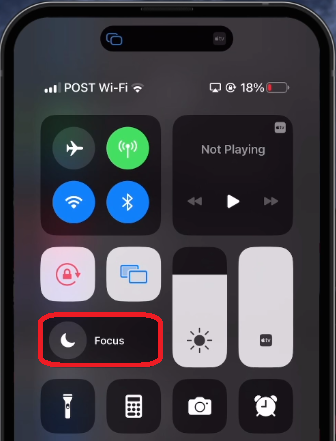
iPhone Control Centre
Checking for iOS Updates to Access Full Features
If you're unable to find these settings on your iPhone, it's recommended to verify if your device is operating on the most recent iOS version. From the main settings of your iPhone, journey down to the 'General' section. Once there, you will find the 'Software Update' option.
Click on it to check for any available updates. If there is a new iOS version, proceed to download it. For instance, if you're currently using iOS 14, and iOS 15 is out, you should upgrade to enjoy full functionality, including the 'Do Not Disturb' feature. After successfully updating your iOS, ensure to restart your iPhone to complete the process.
By keeping your iOS up-to-date, you're not only optimizing your device's security and performance, but also unlocking the full potential of features like 'Do Not Disturb', thereby enhancing your experience with Apple devices.
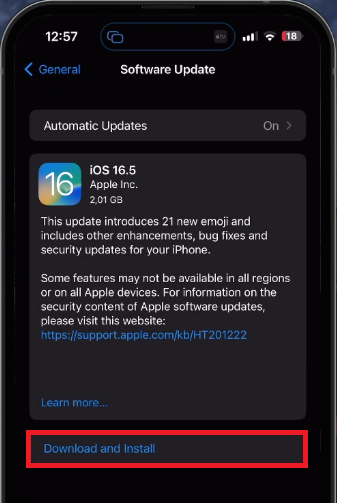
iPhone Settings > General > Software Update
-
You can block all incoming calls on your iPhone by utilizing the 'Do Not Disturb' feature in your settings. Navigate to 'Focus', then select 'Do Not Disturb'. You can set restrictions for who can reach you during this mode, effectively blocking all unwanted calls.
-
Yes, during the 'Do Not Disturb' mode, you can opt to allow calls from select individuals, such as your emergency contacts. This ensures you don't miss any critical calls while still maintaining your peace.
-
By disabling the 'Allow Repeated Calls' option in your 'Do Not Disturb' settings, you can prevent someone from reaching you even if they try to call a second time within three minutes.
-
You can quickly toggle 'Do Not Disturb' on and off by swiping to open your control center and tapping on the Focus mode. This allows you to manage your phone call settings more conveniently.
-
If you're unable to locate the 'Do Not Disturb' feature, ensure your device is operating on the most recent iOS version. You can check for updates by navigating to the 'General' section in your settings, and then selecting 'Software Update'. After downloading the latest iOS version, restart your iPhone. This should enable access to the 'Do Not Disturb' feature.