How To Use Custom Crosshairs In Fortnite On PC
Fortnite is a popular battle royale game that has captivated gamers worldwide. One of the ways to enhance your gaming experience is by using a custom crosshair. In this article, we will provide a step-by-step guide on using custom crosshairs in Fortnite on PC. We will also discuss the benefits of custom crosshairs and how they can help you become a better player. So whether you're a beginner or an experienced gamer, this article is for you. Let's dive in and learn how to use custom crosshairs in Fortnite on PC!
Install the Fortnite Crosshair Changer
Click here to download the Fortnite crosshair changer.
After downloading the Fortnite Crosshair Changer file to your system, proceed to unzip the file using any unarchiving software. We suggest using 7Zip. After unzipping the content, open the Fortnite Crosshair Changer folder and navigate to Custom Desktop Logo.
Adjust the Custom Desktop Logo application to show a crosshair
You should now see a brand logo on the bottom right of your screen. Go back to the Fortnite Crosshair Changer folder and navigate to “Other crosshair”. A new folder will open up, where you can select the crosshair you wish to use.
Create a new folder (any name) in the other crosshair folder
Drop the crosshair you wish to use into your new folder
Copy the folder, and go to: Fortnite Crosshair Changer, Custom Desktop Logo, System, Images
In this folder, paste the folder you copied before
Toggle the Custom Crosshair ON and OFF
Open up your System Tray and select the Custom Desktop Logo application
On the new window, select Change Image Folder
Next, search for your newly created folder
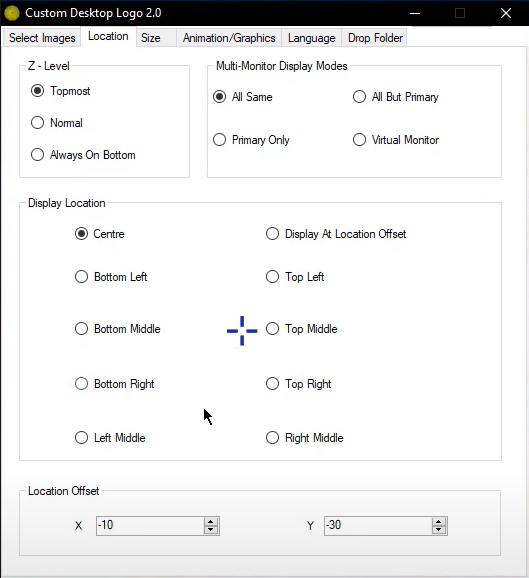
In the Custom Desktop Logo application, navigate to the Location tab
Here, set the Z-Level at the Topmost to display the crosshair on top of any other application
In the display location section, select Centre


