How To Change Your Facebook Page Name - Tutorial
Introduction
In the dynamic world of social media, rebranding or simply keeping things fresh can be crucial. That's why knowing how to change your Facebook Page name could be a game-changer for your online presence. Whether you're using Facebook's mobile app or web interface, this tutorial offers a comprehensive guide for navigating through Facebook's settings to rename your page. Take note, Facebook has specific rules and a review process, so you'll want to get it right the first time. Let's dive in!
Renaming Your Facebook Page: A Step-By-Step Guide
Whether you're using the Facebook mobile app or prefer browsing on your desktop, the steps to change your Facebook Page name are straightforward. However, for this guide, we'll focus on the web version of Facebook.
Access Your Page Profile
Navigate to Facebook: Open your preferred web browser and visit Facebook.com.
Log In: Use the credentials for the account that's linked to the Facebook Page you wish to rename.
Go to Your Page: Once logged in, switch to your Page's profile by clicking its name on the left sidebar or searching for it in the Facebook search bar.
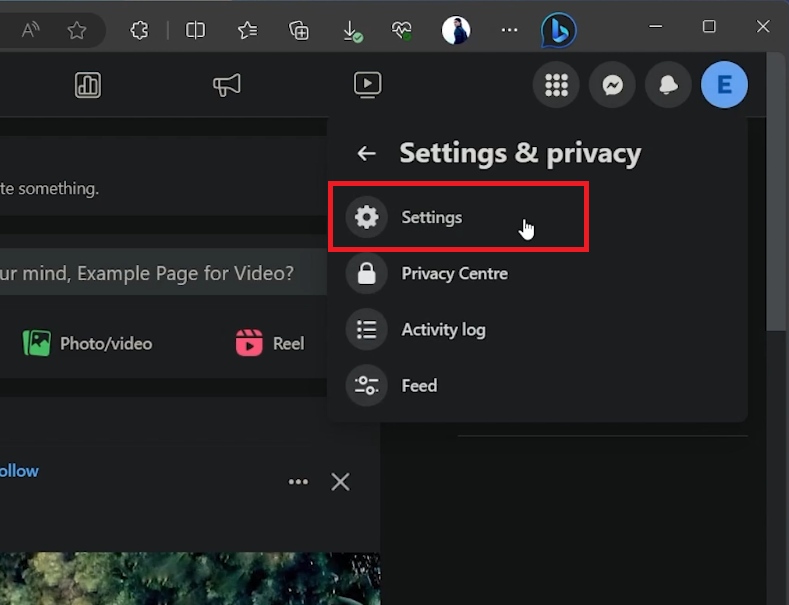
Access your Facebook page settings
Navigating the Settings
Locate Settings Icon: At the upper-right corner, click on your Page’s profile icon.
Select from Drop-Down: A drop-down menu will appear. Choose "Settings and Privacy," then click on “Settings” to access your Page's general settings.
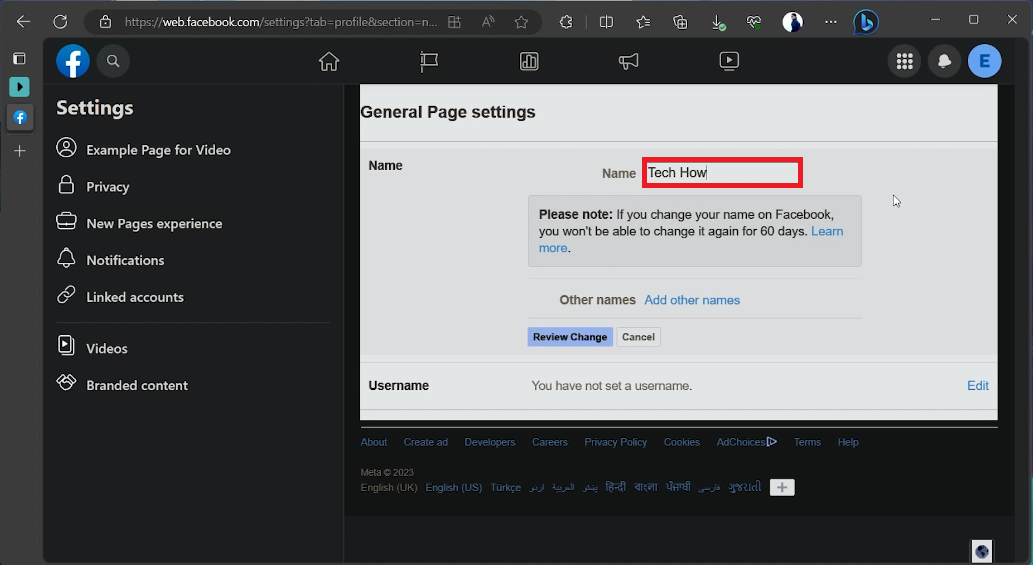
Change and Review the New Name
Edit Name: In the settings menu, find the option for your Page name and click "Edit" beside it.
Input New Name: Replace the existing name with your desired new name. Make sure it aligns with Facebook’s naming rules. For example, avoid using all caps or special characters.
⚠️ Important: Before hitting the "Review Change" button, remember that Facebook may take up to 3 days to review your name change request. Additionally, you can't alter the name again for another 60 days.
Submit Change: Click "Review Change" to finalize the process. Follow any additional prompts to complete your name change request.
And there you have it—a straightforward guide for changing your Facebook Page name with ease.
Change Facebook page name
-
Yes, you can change your Facebook Page name using the mobile app. The steps are similar to those for the web version, although the layout may differ slightly. Navigate to "Settings and Privacy" in the menu to find the option for renaming your Page.
-
Facebook may take up to 3 days to review and approve your new Page name. It's crucial to plan ahead, especially if the name change is tied to a rebranding or marketing campaign.
-
Yes, once you change your Facebook Page name, you cannot alter it again for the next 60 days. Make sure that the new name aligns with Facebook's naming rules to avoid any delays in approval.
-
When selecting a new name for your Facebook Page, avoid using all caps, special characters, or misleading terms. Your new name should clearly represent your brand or purpose of the page.
-
If Facebook disapproves your name change request, you'll be notified and given a reason for the denial. You can submit a new name that adheres to Facebook's naming guidelines for another review.